Design and implementation of attender robot Using raspberry pi
Objective
Utilizing Raspberry Pi, we design and implement an attender robot, enhancing efficiency and reducing human intervention in tasks such as delivery, surveillance, or assistance."
Abstract
The attender robot, built around Raspberry Pi , is an innovative solution designed to autonomously navigate through rooms based on user commands. Utilizing a combination of hardware components including DC motors, a 5V power supply, a 12V battery, a robot chassis, wheels, a USB web camera, slide switches, connectors, dummy shafts, a motor driver (L298N), and a micro SD card (32GB), the robot integrates seamlessly to execute its tasks. When prompted with commands such as "1", "2", "3", or "4", the robot interprets the instruction, activates the USB web camera to capture visual input, and employs image processing algorithms to recognize the designated room number. Leveraging this information, it maneuvers through obstacles, directing its movement using the DC motors controlled by the motor driver, until it reaches the specified destination. This attender robot showcases the fusion of hardware and software, offering a versatile and efficient solution for room navigation and attendant tasks.
Keywords: RASPBERRYPI , USB WEB CAMERA, Motor Driver, Micro SD Card(32Gb).
NOTE: Without the concern of our team, please don't submit to the college. This Abstract varies based on student requirements.
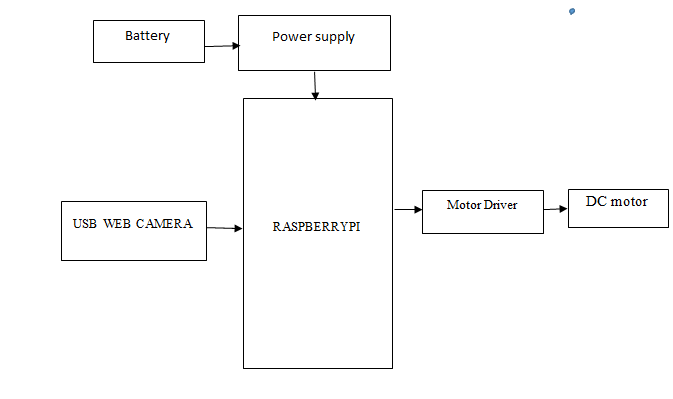
Block Diagram
Specifications
Hardware Requirements:
- RASPBERRYPI 3 MODEL
- DC MOTOR
- USB WEB CAMERA
- Motor Driver(L298N)
- Micro SD Card(32Gb)
- SLIDE SWITCHES
- 5V POWER SUPPLY
- 12v BATTERY
Software Requirements:
- Python IDLE
Learning Outcomes
- RASPBERRYPI Pin diagram and Architecture
- Installation for Python IDLE
- Working of Dc motor
- How to connect DC motor and motor driver?
- Working of USB WEB CAMERA
- How to connect, USB WEB CAMERA to RASPBERRYPI?
- Working of Micro SD Card(32Gb)
- How to connect LCD to RASPBERRYPI?
- Introduction to serial communication
- About Project Development Life Cycle:
- Planning and Requirement Gathering (software’s, Tools, Hardware components, etc.,)
- Schematic preparation
- Code development and debugging
- Hardware development and debugging
- Development of the Project and Output testing
- Practical exposure to:
- Hardware and software tools.
- Solution providing for real time problems.
- Working with team/ individual.
- Work on Creative ideas.
- Project development Skills
- Problem analyzing skills
- Problem solving skills
- Creativity and imaginary skills
- Programming skills
- Deployment
- Testing skills
- Debugging skills
- Project presentation skills
- Thesis writing skills


 Paper Publishing

Request Call Back
Would you like to receive a free callback now?
Choose the best time for callback:
Leave your message and we will contact you as soon as possible

6-2-85/B, Old Maternity Hospital Road, Thyagaraja Nagar, Tirupati, Andhra Pradesh – 517501
+91 9030333433
+91 9393939065
0877-2261612

Disclaimer - Takeoff Edu Group Projects are not associated or affiliated with IEEE in any way. The IEEE Projects mentioned here are mentioned in the context of student projects, whose ideas are derived from IEEE publications, not projects of or by IEEE.